If there is one thing that I learned while traveling with a backpack for 4 months is that, we don’t need much to live. Some food, tons of water, a place to stay and some clothes are the basic essentials. With all the tiny house shopping, minimalism is becoming a bigger thing. Now, I admit, I was never a big shopper. In fact, I read articles from time to time on how can I save more money and I go down the list and say yes to doing about 80% if not 100% of the items on it. But one thing I have been working on for years is letting go of items I do have.
I grew up in a house where my parents saved quite a bit of stuff. This led me to being terrible at getting rid of stuff myself. It’s funny because it seems that most of my family is in a “get rid of” stage at the moment. My sister has always been the best at it and she is doing a big purge right now. Me, I didn’t realize the amount of stuff I had until I moved into a dorm room in college and realized I could survive without 90% of my stuff. It then took me little by little each summer to let go of things. Then in 2014, I moved to Philadelphia. This time, my parents didn’t want ANY of my stuff stored at home. I sorted my stuff for a month, making piles for donation, garbage and keep. Then I would look again at the keep pile and wonder if I could part with more. I packed up my car with the essentials and a few other things and my parents shipped the rest of my “to keep” stuff to me. The thing is, most of my “to keep” stuff remained in boxes, first in a living room and then in a closet in my next apartment. Moving 3 times in 3 years, I continue to part with more, because moving it from place to place is just a PAIN! Plus I have learned, I am happier with less. Less clutter and more open space are my goals.
In December 2016, Brian and I packed up our (though it was majority of my stuff) Philadelphia apartment. I sold some of our furniture and also sold some things through ebay for the last two months of the year since it was Christmas season. Other stuff was set next to our apartment dumpster, donated or given to friends. One thing I did keep though was a large box of t-shirts.
I brought my t-shirts back to Chicago with me over the holidays with plans to sort through them. I tend to wear plain colored tees these days, but not all the free ones I got during school years. However, I didn’t want to just donate them as I had memories with these shirts. I have known about Project Repat for a couple years and I finally decided I needed to make a t-shirt quilt. Well the holidays were busy with meeting up with friends and packing for our big trip, so the box sat in a closet for another 4 months while I traveled.
Disclaimer: This post contains affiliate links.
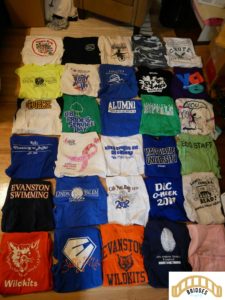
Finally in April, I was back home for 2 weeks and I knew my main project that first week was to tackle the t-shirt box and finally send my shirts to Project Repat. I had no idea how many t-shirts I had! I think there were about 70 squeezed into that box! Keep in mind, most of these were free from events or necessary purchases (aka swim team shirts, gym uniforms). I sorted the shirts into multiple piles: t-shirt quilt, donate, garbage and keep. Then I started to sort through the ones I wanted in a quilt to lay them out and see how many I had.
The process:
- I went onto Project Repat ’s site to check out the size quilts.
It turned out I had exactly 30 shirts I wanted as a quilt, which meant I went with the full size. You can check out their website for details on number of shirts for different sizes.
- Next, choose 12 inch or 14 inch squares.
Since I had some shirts with larger logos, I chose 14 inches. When choosing, you want to be sure that your shirts all have the 12 or 14 inches available otherwise you will be charged extra for them adding fabric to make it work.
- Purchase your quilt online.
You do pay in advance. Also check to see if they offer any discounts. You can follow my link to sign up and receive a discount. I received 15% off for it being my first quilt. If you sign up for their email list, they also have special promotions and discounts through the year.
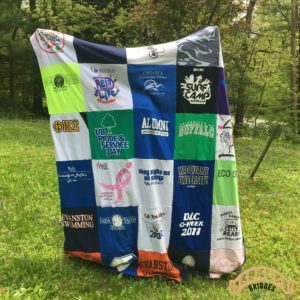
I laid out my t-shirts on the floor so I would see what the quilt would look like. You have the option to arrange the shirts for an extra $30 (billed later) or you can just send in your shirts and they will arrange them for you. In order to send in the shirts, you need to make sure that any shirts with 2 sides are cut according to their instructions (you don’t cut the squares, just along the seam). You are allowed to use both sides of a 2 sided shirt, another reason it is important to have them cut. I played around with the arrangement of my shirts, especially since I wanted my alumni shirt in the middle. I arranged it so that it tells a story, starting from the top left with my character counts shirt I received in elementary school and going clockwise and into a spiral following my memories through middle school, high school and college.
- Find a box and ship off your shirts and wait 2-4 weeks
I’ll be honest, I was glad I had the 15% off because shipping was not cheap for 30 shirts, around $20. Since I arranged mine a certain way, I had to send in a photo of the arrangement for them to follow as well. My quilt took about 4 weeks to arrive. You can add rush shipping if needed.

I believe the process is pretty simple. It did take me a few hours to arrange my shirts and also carefully cut them in preparation. Now you may be wondering cost and it depends on what size you choose. Since I went with a full and 14 inch squares (a bit more than 12 inch) and got a 15% discount, it came to $134 for that. Then you pay shipping for your quilt and any additional charges (for me, arrangement was $30) so I spent about $180 on this quilt. Yes it’s a lot, but it was worth it to save these shirts for years. For now, the quilt is on my bed, but if I get a house in the future with a big enough wall, I may hang it up. I think it would be a good conversation starter for sure. I highly recommend Project Repat. If I build up more shirts, I may even get another quilt in the future. Check out this link to sign up and get a discount.
Disclaimer: This post contains affiliate links.
Have you made a t-shirt quilt or plan to?

